How to Compost in the City

Composting is a beautifully natural and effective way to reduce food and organic waste. But for city-dwellers like myself who lack outdoor space, urban composting is a little less straightforward. Growing up, the only composters I knew were my grandparents, who lived in the country. They loved the steaming pile of dirt in their backyard, which I thought was equal parts weird and awesome. These days, I fully appreciate the magical transformation of kitchen and yard scraps into ‘black gold,’ and I’m not alone. More and more urban folk like myself are embracing composting as a way to make their city a little bit greener.
Composting is for Everyone
Back in 1996, San Francisco became the first US city to implement a composting program, as part of a goal to hit zero waste by 2020. By 2017, the city was diverting 650 tons of organic matter per day from the landfill. Although San Francisco hasn’t yet hit that zero waste goal, the benefits of a citywide composting ordinance cannot be understated. Composting is awesome because it...
Reduces food waste:
Forty percent of all food in the United States is wasted. And where does most of it go? The landfill. While the best way to reduce personal food waste is to eat what you have, the second-best way is to turn organic food scraps into valuable soil.
Reduces methane emissions from landfills:
Organic scraps make up an estimated 15-20% of the world’s landfill space. In nature, organic matter decomposes thanks to oxygen-breathing microorganisms. When the organic matter gets trapped under mountains of landfill trash, there’s no oxygen. Instead, it breaks down through anaerobic decomposition. The product of this breakdown is methane, a potent greenhouse gas that contributes to climate change.
Reduces the need for synthetic fertilizers:
Compost contains nutrients that plants love - namely phosphorous, nitrogen, and potassium. But it has also proven to increase water retention even in sandy soil. When compost is added to soil that contains synthetic fertilizers, it minimizes the runoff of that fertilizer into our lakes, streams, and oceans.
If San Francisco can do it, other cities can - and hopefully will - follow suit. But until more programs are implemented, it’s easy enough for us individuals to take composting into our own hands. In fact, it's one of the of the easiest and most significant steps that you can take towards living a zero-waste lifestyle, among.
Urban Composting 101

If you don’t have a yard (or friend’s yard) in which to build an outdoor compost bin, you have two options: Find a municipal composting program, or compost indoors. Let’s start with the first option.
Municipal Composting
If you’re lucky enough to live in a city that does have a composting program, then take advantage of it. You may not even know that your city offers such a program, so be sure to check!
How Does Municipal Composting Work?
Some cities will give you a bin (typically green) in which you contribute your food scraps. Just like with your municipal garbage and recycling programs, a curbside pickup comes along every week to take your scraps to a composting facility. If curbside compost service isn’t available, chances are that a private composting service can help you out. For example, LA Compost has free neighborhood compost drop-offs in Los Angeles where anybody can deposit their scraps. Alternatively, CompstableLA is a paid service that provides you with a four-gallon compost bucket and sawdust. On pick-up day, they’ll take your full bucket and give you a new one.
A few tips for saving your scraps for pick-up/ drop-off day:
Freeze your scraps. If you happen to have freezer space available, you can put your food waste in a container and stick it in the freezer to prevent odors.
Get a compost crock. Compost crocks are ventilated containers that allow you to store your food scraps without freezing them. Many times, they have charcoal filters to reduce odors. You can pick up a crock online, or follow a simple DIY plan.
Indoor Composting
Yes, you can compost indoors. Once you know the rules of the game, it’s surprisingly easy to make rich, earthy soil in the comfort of your own home.
Aerobic Indoor Composting
With aerobic composting, oxygen-dependent microbes are responsible for the decomposition of organic materials. Indoor aerobic composting is just like an outdoor compost pile, but indoors. Aerobic composting creates heat, water, and a very small account of carbon dioxide. Although CO2 is considered a greenhouse gas, the amount produced by aerobic composting is negligible… especially when measured up to anaerobic composting and the resulting methane (which is a much more potent greenhouse gas than carbon dioxide). To get started with aerobic indoor composting, you need an indoor compost bin. It doesn’t need to be fancy, but specialty bins are also available for sale online.
DIY Indoor Aerobic Compost Bin

Materials:
A container (ideally less than 5 gallons) and a fitted lid.
A tray to catch liquid
Some shredded cardboard or newspaper.
A drill to put holes in your bucket.
Wire mesh (optional)
Ingredients:
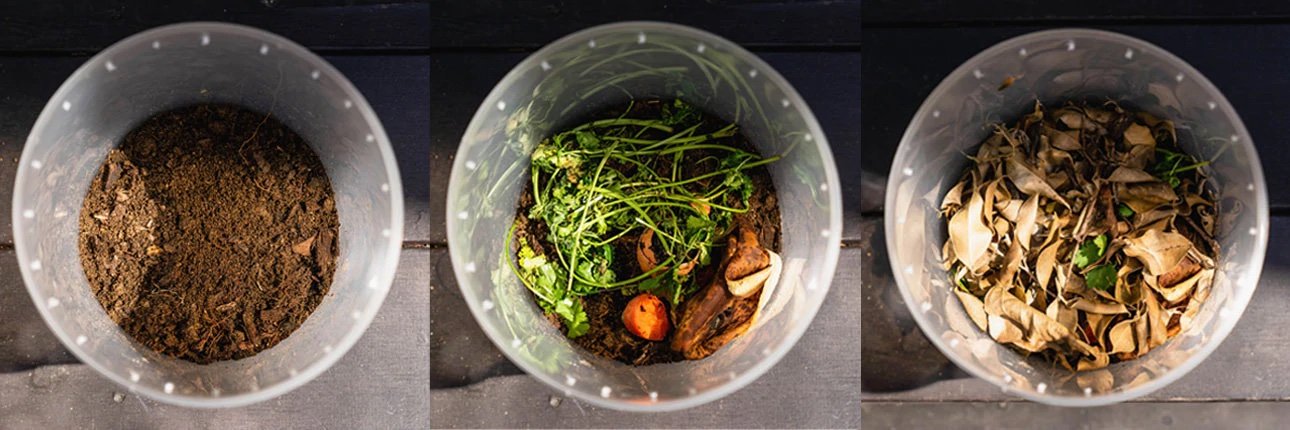
Organic soil - You’ll need about two pounds of organic soil, which won’t be used all at once. Soil contains the microorganisms that will trigger the composting process. You can buy this soil from a garden store, or (with permission!) take some from a community garden.
Green matter - Greens are your kitchen scraps made from products that were recently growing - which are usually plants and vegetables.
Brown matter - Brown matter consists of dried leaves, cardboard, paper, newspaper, and scraps with more carbohydrates.
Steps:
Choose your container. You can use a metal or plastic bucket or box. It is ideal to start out with a smaller container (about two gallons) as it will take time for your compost to become productive.
Find a space for the container, ideally in the kitchen. Under the kitchen sink is a great location, as compost does best in warm and shadowed environments.
Take your drill, and put evenly spaced holes - about ½ inches apart - around the top rim of your bin. These holes allow oxygen to enter the container. Although some people put the air holes on the bucket lid, we have found that holes on the side tend to minimize any odors.
Cover the bottom of the container with about two inches of soil. You’ll want to build your compost slowly and in layers. On top of the soil, add a thin layer of greens, and then cover this in some browns.
Wait a few days, and then mix your compost. Add another layer of soil, greens, and browns. If your compost seems to be too damp, you can add another cup of soil and some more brow matter. Check back every few days to mix up the decay and add more scraps.

Tips for Maintaining Your Indoor Aerobic Compost Bin
Pay attention to moisture levels. The compost should be about as wet as a damp sponge. If it gets too wet, then the ingredients will rot. If it’s too dry, then the materials will take longer to decompose.
Once decomposition has started, it’s best to keep the green and brown matter mixed up in the soil. You especially don’t want fruit rinds exposed to the air, as this could attract flies.
Cutting up your kitchen scraps before adding them to the compost bin can help them decompose more quickly. This is a particularly good practice when you start your compost.
Don’t put the following in your bin:
Animal products and by-products
Anything very fatty or greasy
Teabags (they usually contain plastic)
Charcoal
Diseased plants
Animal waste
Bread
Citrus
Anything treated with pesticides
Do put the following in your aerobic bin:
Cardboard
100% cotton or silk fabric
Crushed eggshells (not whole eggs)
Hair and fur
Leaves of houseplants
Alternative Methods of Indoor Composting
Indoor Vermicomposting
Vermicomposting - or worm composting - isn’t much different than aerobic composting in terms of setup. It’s an easy next-step to take after you’ve established an aerobic compost bin. The biggest difference with vermicomposting is that you’ll add worms to the mix. Worms help breakdown the organic matter and turn it into rich soil.
Your pet worms can be a little picky and don’t like to be overwhelmed with too much food. Therefore, you’ll need a compost crock to save your scraps for feeding day. In general, the same rules apply to vermicomposting that apply to aerobic composting - worms don’t like meat, dairy, or anything carb-heavy. You'll need to watch what your worms do and do not like to eat.
To start vermicomposting, follow all of the steps for aerobic composting. You need to build up healthy soil before you add your worms. When the soil is ready, you can add your red wriggler worms. A few sources for red wriggler worms include:
A local compost station
A school or community college compost
Your local garden shop
An online shop like Uncle Jim's Worm Farm
Bokashi
This Japanese method of composting lets you contribute pretty much any kind of kitchen scrap to your compost bin, including meat and dairy products. It differs from aerobic composting in that the waste is broken down through fermentation. The mixture is inoculated with beneficial bacteria, which also makes the composting process a lot faster than that of aerobic and vermicomposting.
While you can make your own bokashi bin, it’s probably easier to pick one up (or buy one secondhand). That’s because the fermentation of bokashi creates a lot of liquid, and you'll need a more complex setup to drain all of the liquid out. This liquid is great for your houseplants! Here are some sources for Bokashi Bins:
The Bokashi Bucket - This site has both bokashi bins and the soil that contains the necessary beneficial bacteria to kickstart the bokashi.
Bokashi Kit - This is a complete bokashi kit from Solana Center, which includes everything you need to get started with bokashi (except for the food scraps).
Common Questions About Indoor Composting:
What should I do with my finished compost?
Give it to your houseplants
Spread it on your apartment building’s lawn or garden
Give it to friends
Donate it to a community garden
How do you know when soil is healthy?
A healthy compost doesn’t have a bad odor. Rather, it has a pleasant, earthy must. You’ll also know that your soil is healthy when your scraps decompose rather quickly. This indicates a high level of healthy, aerobic microorganisms or worms.
What do I do if my compost has a bad odor?
If your compost has a rotting or amonia-like smell, it's likely because there is too much green matter, which can add a lot of liquid. In this case, try adding more brown matter to balance the moisture levels. If your compost smells like sulfur, or rotting eggs, it may not be getting enough oxygen. If this is the case, you should increase airflow by drilling more holes.
Do you have any experience with indoor composting? Let us know in the comments!